Showing posts with label Recipes. Show all posts

Thursday, June 21, 2012

Cooking & Crafting

I've been keeping up with my exercising. I really don't like it. I actually kind of hate it. As in, I find some of my first thoughts of the day be something like, "Dang it... It's a new day which means I have to fit in another workout." But I want to be strong. And healthy. And energized for the active Hunnybuns. And after growing a baby in my once-tight abdomen, a sweaty workout is what I need to put in.

And that means Jillian and I have been having some rockin' one-on-one time together. I think I have her entire Shred DVD memorized. Except for level 3. Woo! I still get winded with level 2. I have an amazing group of momma's on My Fitness Pals that have been incredibly supportive and encouraging. We all had our little baby within a month of each other. One of ladies suggested to me a website full of figure-friendly recipes. Skinnytaste.com

Y'all, I've started cooking. I used to love it. But with my pregnancy and subsequent nausea issues, it just kinda died away and fast food became so much more appealing. Here's a few dishes we've had over the past week. These are tried and true! You'll love it!

Zesty Lime Shrimp and Avocado Salad

Asian Chicken Lettuce Wraps

Vietnamese Shaking Beef (Bo Luc Lac) w/ lime dipping sauce

 Overnight oatmeal smoothies! My favorite is the Pineapple Coconut Oatmeal Smoothie. I ended up not using the vanilla and chia seeds (I didn't feel like heading to the grocery store!) but also added spinach. Crazy tasty! But I'm definitely going to start adding the chia seeds for it's great health benefits and thickening agent. I really don't like runny smoothies. Pina Colada's anyone?

Oh yeah, and I've been getting my craft on with my apothecary jars. I haven't been feeling like making anything... and having a zero $ budget will put a damper on my Pinterest finds. But after Easter, I switched up these jars and put together a cute Spring and 4th of July version. My spring set was full of bright colored candies. For the July 4th jars I used great northern beans, red kidney beans and black beans (they look blue!) and flowers (I didn't take an updated pic!)
I love it I love it!


Sweet, teething Savannah calls the shots when it comes to church and nap time. I got some great tips from my Instagram friends to help with balancing my activeness in church and a grumpy tired infant. 

Guess which toe I sprang. Now it's all sorts of puffy blue and red. It pairs well with my cute fresh pedi, don't you think?
      
 I have to agree with the 3-year old at the Splashpad park today... "I love her fluffy cheeks!"

Yours truly, Me

Thursday, April 19, 2012

Making Pretty Lil' Things.

null
Whoa whoa whoa. It's mid spring already, guys. It seriously feels like I was just decking the halls with all things red&white while listening to the Carpenters on the Christmas radio station. Yet here I am trying my best to not run out in my swimsuit every time the sun peaks through the beautiful spring skies. It's here to stay, I tell myself. That blasted, toasty Texas sun. But it's so yummy right now and feels so wonderful on my wintery bright skin.
Me and the Hunnybuns have had the best walks in our stroller. Cruising the neighborhoods ... and the outdoor mall that just so happens to be right around the corner. I'm certain that my other half and I mention our love for our home's ideal location on a bi-weekly basis.
I'll be honest, I purposefully alternate my change in hair style, and clothes, and bjorn vs. stroller each visit I make into Hobby Lobby. It's embarrassing how often I stroll their aisles. I'm into creating pretty little things for my home. As in, I've stayed up late into the wee hours of the evening pinteresting it up on my phone. Brightness turned far too low in efforts to avoid notice from my sleeping Loverbuns. While only to wake up having CRAFTS! on my mind.
I live in addictions, ya'll. Baking... Cooking... Reading... Cleaning... Exercising... Decorating... Dating/Relationship-ing (my one and only boy, of course)... TV Seasons (Shout outs to my favs The Firm, Alcatraz, American Idol, The Voice and my guilty pleasure ...Dance Mom's-- It's ok. I already know you'll be judging me from here on out.)
I'm going off topic. I have a sad little story to share. Earlier this month I had a small little break down. "Tear fest 2012" to be more clear. The people in my life who I am really close to will know that I'm a super sensitive, wear my heart on both my sleeves kind of girl. I take many things far too personal and can, in many circumstances, get distracted from the most important things and relationships in my life. I'm learning that my sensitivity can be both my biggest strength and most detrimental weakness. Especially when it comes to myself. As a spankin' new mommy, I was finding it difficult to create a balanced life.  And I was needing to discover how I fit into this new role as a mother. No longer a student. Or the employee with the 8am-5pm job. Or the girlfriend without any kiddos. My new life has a role with no rule books, no class schedules, no co-workers, no boss. It has everything except what I am familiar with. How do I balance all of these encouraging and exciting new parts to my life?
My sweet hubs and I recalled a discussion at BYU with a professor and was reminded that

you simply can't balance everything at once. 

I can't balance these addictions that I mentioned previously all at once. I need to prioritize my life with what feels right for me at the moment, and give that my complete energy and attention. And to stop giving myself an awful time for not doing more and being more. I finally realized that making changes requires hard work and being OK with being a different version of myself. I will feel a push to focus on my relationship with those that I love. Then, I will have times of feeling a deep desire to dig deep into my soul and strengthen my love for the Savior and His church.
And now, crafting. Simply put, it makes me happy. It fills my little cubicle of domestic accomplishment. I get to re-live the loveliness of said craft each time I stroll through the living room.

I found my inspiration for my Easter jars from the Christmas Apothecary jars made by the girls at Uncommondesign.
                                               
Wod candlesticks & round bases & finals, ceramic & wood glue, glass canisters, funky wooden letters, ribbon, sandpaper, and my favorite spray paint and sealer. 
                         null
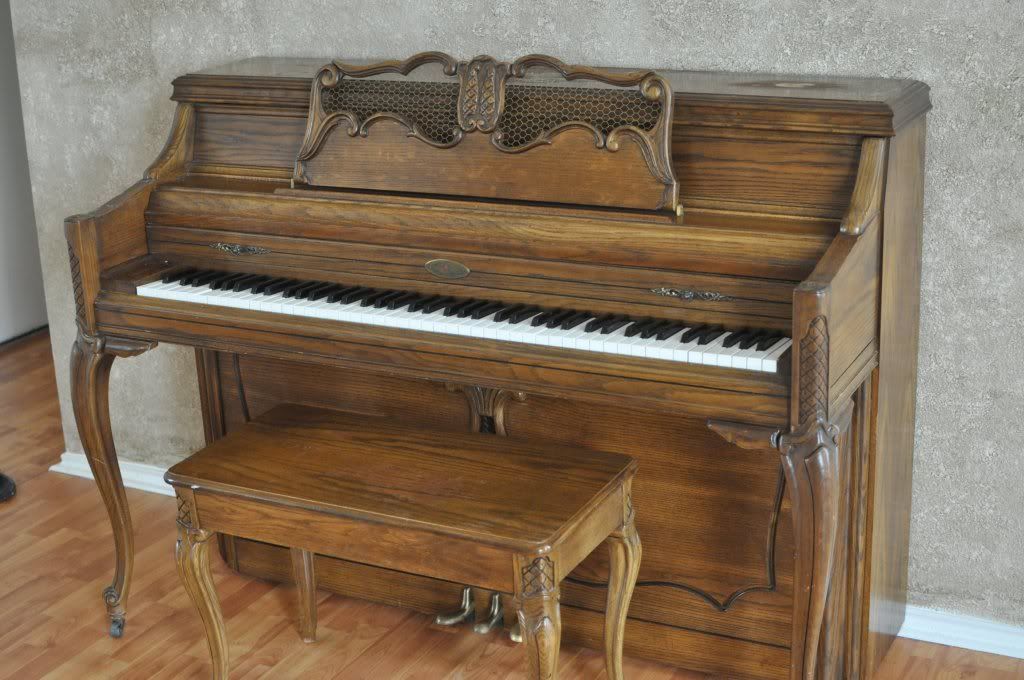
Ooh yea. We bought this hawt piano. Isn't it beautiful?! I love the curvy legs and scrolly music stand! But I wasn't diggin' the chicken wire wrapped behind music stand or the light color of the stain. Kind of a drab, right?
null

Soooo... we ripped off the chicken wire and re-stained the entire piano! I'm so excited about how it turned out!
(A few weeks ago, I wanted to change my blog template and everything got all sorts of messed up and I lost all of your blog websites that I would typically stock. I am so sad about it. It may take me a while to find all of your addresses again!)

Ps. Thank you for the lovely birthday wishes! Loverbuns and I really look forward to our shared birthday week. I spent the day grocery shopping, visiting teaching, and Savannah spent the evening having some quality grandparental time. We spent a beautiful night at home indulging on our favorite splurges including filet mignon. We're talking eyeball-rolling kind of good. It was just ridiculous how tender it was ... even forgetting to add A1 sort of amazing. amc gave me a massage that would make your little toes tingle. Dropping the cherry on top, this boy busted out with a surprise hand-written love letter. Not some phony cheesy story, but rather a completely genuine letter from the heart. He's kind of a gem like that. Afterwards, we went to a few shops at the mall and picked up a few super cute outfits on our parents tab.
                                    It will go down as one of the sweetest dates I've been on!

                             Photobucket
Yours truly, Me

Wednesday, March 2, 2011

Super Yummy Homemade Oreos

Although I don't allow myself to eat them very often nowadays... (alright, I just realized we're going on our Hawaii trip next week, and let's just say that my food choices haven't been as 'figure-friendly' as my tummy would like!) ...left to my own devices, I do believe I could polish off an entire package. My current fave would be the mint Oreos. Lookey here, I'm salivating as I type the word. Honestly, it's a problem. And that's why after I baked these bad boys I promptly gave them away; because I knew it wouldn't be long before I started stacking them in piles and eating away the whole batch one pile at a time. Ok, ok, so maybe I enjoyed one or two before giving them away.
If you're an Oreo fan, you've got to try these cookies. I was amazed at how much they tasted like the originals, albeit in a freshly baked, more sophisticated sort of way. The chocolate really shines through in the cookie portion, and even though I'm a huge fan of the filling in store-bought Oreos, I am a new-found fan of the homemade stuff.
Homemade Oreos
2 pkgs Devil's cake mix
4 eggs
2/3 C. canola oil
Frosting
8 oz. pkg cream cheese
1/2 C. butter
5 C. powder sugar
2 T vanilla
8 oz. cool whip
Combine the cake mixes, eggs, and oil together. Mix thoroughly. I rolled out my cookie dough onto a floured surface. You can go the simple route by scooping the dough into spoonfuled chunks and place them directly onto the cookie sheet. I didn't like how messy the oreos were because of the 'imperfect dome-y' cookies. Trust me, roll them out. They'll be so much prettier.
I used the rim of a glass to cut out proportional sized cookies. Use your noggin'. Get creative!
Place these beauties onto a greased cookie sheet and bake for 7 minutes on 350 degrees.
While the cookies are baking, mix up the frosting. Cream together the cream cheese and butter. No chunks and no light substitutions over here! Add vanilla. Slowly stir in powdered sugar. Mix with the cool whip. Place a few tablespoons of frosting onto the ugliest cookies. Top with a cookie and lightly press down to seal it in place. Voila! Now enjoy your super yummy homemade oreos!
Sincerely, Little Bakin' Blonde

Saturday, January 8, 2011

Cinnamon French Toast with our 'Better-than-Kneaders' Syrup


If you're familiar with the Kneaders bakery found in Utah then you must have had a heart to heart with their unlimited french toast and infamous, tasty, caramel-like syrup. Supposedly they used to make it with buttermilk. Now, they use evaporated milk with the number one ingredient being water.
Shame on them.
A few years ago, me and my handsome sou chef made our own version. We love it so much and haven't returned to Kneaders since! Okay, I lied. I totally have....To buy their extremely delicious Cinnamon Burst bread. Huge, soft, and oh so yummy. It's the best bread for this french toast. I did use french bread loaves this time because I haven't found a yummy replacement for the Cinnamon Burst bread since moving to Texas. This recipe gets whipped up a couple times each year, and every time without fail I've only been able to have 2 slices. It's rich. It's somewhat heavenly.
And it'll probably be in my oven this weekend.
Buttermilk French Toast
2 loaves Cinnamon Burst bread (2 French loaves work as a great substitute)
6 large eggs
1 1/2 c. buttermilk
1 t. cinnamon
1 t. nutmeg
1 t. salt
1/3 c. white sugar
1 T. vanilla
4 T butter & olive oil, for frying
Heat oven to 200 degrees. Combine eggs, buttermilk, cinnamon, nutmeg, salt, sugar, and vanilla in mixing bowl. Whisk together until thoroughly combined.
Cut bread on an angle into 1" thick slices. Dip in egg mixture until soaked through. Once finished with soaking all slices, combine butter and oil and heat on griddle to medium or medium-high heat. Cook slices until golden brown on both sides. Keep warm in oven until ready to serve.
'Better-than-Kneaders' Syrup
1/2 c. butter
1 c. buttermilk
1/2 c. white sugar
1/2 c. brown sugar
1 t. baking soda
1 t. vanilla
In a large saucepan, combine butter, buttermilk, and sugar. While stirring regularly, bring to a boil. Add baking soda and vanilla, it will foam up and bubble at this point. Let boil for 3 minutes, stirring continuously. Remove from heat and cover. It's ready to serve!
Carmelized Pecans
1/2 c. pecans
1 T. corn syrup
1 T. butter
2 T. brown sugar
1/8 t. cinnamon
In a saucepan, combine corn syrup, butter, brown sugar, and cinnamon on medium-high heat. Once it's bubbling, toss in pecans. Continue cooking the coated pecans for 5 minutes. Stir constantly. They will be golden brown and will smell sweet and toasted.
Whipped Cream
1 C. heavy whipping cream
1/2 C. powdered sugar
1 t. vanilla extract
1/2 t. almond extract
Before you're ready, place your mixing bowl (metal works best) in the freezer for 10 minutes. Then, add whipping cream and powdered sugar in bowl and being mixing. This part takes a little while. I always grab a male who looks all too eager to help to do this part. Once the cream begins to form peaks, mix in extracts. It's ready to serve. Of course, if you still have everything else.
Yours truly, Little Bakin' Blonde

Thursday, December 30, 2010

Dipped Chocolate Chip Cookie Balls

Me and my husband are cookie dough fanatics. In fact, when I make chocolate chip cookies, I always reserve some (okay, a lot) of the batter for us. Yes, I know raw eggs can be dangerous. Consider me a rebel. Good thing my micro professor taught me the slim chances of actually becoming ill with salmonella.
And. Oh. My. If you could take perfection, roll it in a ball, and dip it in chocolate, this would be it.
My apologies to the New Years’ resolution people. It may have crossed my mind to hold off a short while to post these, but I just couldn’t do it. Call it a little treat to yourself for doing so well up until this point. While one of these beauties won’t hurt, good luck practicing self-restraint when faced with a cookie sheet full of them. It’s not easy. What is easy is whipping them up. Which I encourage you to go do.


Dipped Chocolate Chip Cookie Balls
Makes approx. 3-4 dozen

2 1/2 C. flour
1 t. salt
1/4 t. baking soda
1 cup butter, softened
3/4 C. white sugar
3/4 C. brown sugar
1 t. vanilla
1/3 C. milk
1 C. mini semi-sweet chocolate chips
14 oz dark chocolate 

In a mixer, beat butter and sugars until light and fluffy. Add milk and vanilla. Stir in flour, baking soda and salt and mix on low speed until incorporated. Stir in chocolate chips.
Cover and chill dough for 1 hour. I know. I know. Good things will come to those who wait.
When dough is firm enough to handle, it may help to lightly flour your hands, form dough into 1″ balls and arrange on a baking sheet lined with waxed paper. Place sheets in freezer and let chill for 30 minutes.
Melt chocolate candy coating in a double boiler or in microwave according to package directions. Using forks, dip cookie balls into candy coating to cover. Tap fork on side of pan to remove any excess coating, and return to waxed paper-lined baking sheets. 
Chill until set. Store, chilled, in an airtight container for up to 1 week (though good luck making them last that long).
Happy Baking!
Yours truly, Little Bakin' Blonde

Monday, November 15, 2010

Gorgeous Caramel Apples


Homemade Caramel:
1 C. Butter
1 C. Corn syrup
2 1/2 C. Brown sugar
1 Can sweetened condensed milk (14 oz.)
2 t. Vanilla
1/4 t. Salt
Decorations:
White chocolate
Sugar/cinnamon mixture
Milk chocolate
Heath candy bits
Nuts
Tips for rockin' caramel apples:
*Wash and scrub the waxy film off the apples before you begin. If you don't, the hot caramel will melt the nasty, waxy layer off and your caramel layer will drip off into a goopy mess. Baking soda works great. Scrub scrub scrub!
*You want cold apples! This will help the caramel to not slip off. Dry the apples really well and leave them in the fridge until your caramel is ready.
*This makes enough caramel to coat 6-8 large apples. I removed the stem from each apple and inserted lollipop sticks. You can even use a heavy bowl to hammer them if you've been completely slacking on your Pilates like I have.
Let's get dipping!
In a large saucepan, melt butter over med-high. Add syrup and sugar and stir until dissolved. Bring to a boil and then slowly add condensed milk while stirring.
Continue to stir while it thickens and darkens for 30 minutes. If you want to use a candy thermometer then you'll cook the caramel until it reaches the "firm ball" stage, which is 245-250 degrees F. I used a thermometer twice and ended up burning it twice. So, my appetite decided to not let me use the thermometer anymore. Essentially, the firm ball stage is reached when you can drop a piece of caramel into cold water, a firm ball forms.

Remove caramel from heat and stir in the vanilla. You'll want to have your apples and greased wax paper ready to go.
The fun part! Dip the apples at an angle and rotate in the hot caramel. Then, pull it up and use a knife and slide it under the apple to cut off the extra caramel. Believe me. There will still be a little pool of caramel on the bottom. Which is the best part of the apple once all is said and done!
Place the dipped apples onto greased wax paper. If you want to roll the mix-ins directly onto the caramel then this is the time to roll while it's still soft and warm! Or let the caramel set for an hour or so if you want to dip them into chocolate. 
This is such a fun activity to do with the family!
And the result? Wow. The caramel is heavenly. Double dipping is completely accepted here and heavily done, let me tell you. Paired with the sweet and tart apples?
You make my taste buds dance. 
Yours truly, Little Bakin' Blonde

Friday, October 22, 2010

Making A Girly Fondant Cake

Nearly 2 years ago I started to get this craving to make and decorate a fondant cake. The Food Channel was deadly for this craving and the new Cupcake Wars episodes didn't help either. But, let's face it, fondant is gross. I always peel it off at weddings and parties. Not to mention it's physical form of pasty diabetes due to the sugar overload you'll acquire if you are bold enough to swallow it with your cake. Yuk! So, I kicked Wilton's expensive trash and made a homemade marshmallow fondant. 
Of course, with the help of my super cute sou chef ; )
Since this was my first cake and I honestly didn't know what the heck I was doing, I only did a two-tiered cake. I decided on a red velvet cake for the base and a triple chocolate chip cake for the topper with both slathered with cream cheese filling. 
Mouth watering yet? Ummm mine sure is.
I crumb coated the cakes and put them in the freezer. I made the marshmallow fondant, rolled it out, and had then Aaron help me decide on what colors to do. For some reason, he didn't like my original teal/blue, black, and white color scheme. 
Can I just say that forming this fondant to the cake is NOT easy. At all.
But i did it! And i'm sure I strategically placed the cake in this position for a snapshot to cover any...imperfections. 
Phew! The hard part was over and now I could breathe and decorate.
I used a pizza cutter to get the stripes and bottle caps and glass rims to get the polka dots.
I was really happy with the outcome and how great it turned out! I'm realizing that I like to be alone in the kitchen when I bake. It was so hard to think clearly because there were tons of people, haha. I had one meltdown that i'll shamelessly admit to. Definitely a favorite hobby that i'll continue.

Yours truly, Little Bakin' Blonde

Friday, September 24, 2010

Crunchy-goo Cinnabun Popcorn

I adore cinnamon caramel popcorn. Not popcorn, but the combination of warm cinnamon-butter glazed over semi-crunchy-gooey popped popcorn is pure bliss. It takes me back to my childhood love for Crunch 'n Munch popcorn. Besides being easy to whip up, this popcorn compliments the divided parties among dessert-lovers. Some like it gooey and sticky. Some like it crunchy and dry. I learned this the hard way when I sold this deliciousness at a local pharmacy. I mean really? Who complains about objective preferences? After tweaking this a bit, I think this has the best of both worlds. 

I love to make this for the teachers that spoil Aaron daily with delicious Kolaches and croissants. He's sort of the young and determined celebrity teacher that reminds them of their own children. Cute, huh? I think it's darling and it makes me happy. 

So here's payback, grab your popcorn popper and kernels and let's get baking!

Crunchy-goo Cinnabun Popcorn
adapted from Ourbestbites

16 cups popped popcorn or 1/2 C kernels
1 1/3 C brown sugar
1 1/4 t cinnamon
3/4 C real butter
1/3 C karo syrup
3/4 t baking soda
1-2 t vanilla
1 C halved pecans

What's the worst thing while eating popcorn? Breaking your precious teeth on the tiny kernels you've forgotten to take out of your batch. Biggest understatement. Ever. I use two bowls--one bowl to catch the flying popcorn that's spewing from the popper and another large bowl to transfer the fresh, natural popcorn into. Set aside.

Stir together brown sugar and cinnamon in a 2 Qt microwaveable dish. Cut in butter. Top with karo syrup. 
Microwave for 1 minute. Stir with a large, rubber spatula (this won't crush your beautifully large popcorn pieces later on.) Microwave for another 2 minutes.  
You want it to be hot and bubbly. BUT, but.... don't overcook this. You may end up with a hard clump that won't drizzle nicely over your popcorn but your husband may be a little more optimistic by thinking it'll still be scrumptious as sugary globs and you'll then need to whip up another batch really quick and pour it over your popcorn. Don't over cook it. I'm just saying... 

Next, stir in vanilla and baking soda which will make it pop and bubble into a foamy-mess. Quite divine. This is also the part where you'll be tempted to lick the spatula. Don't. Not yet.

Sprinkle the nuts on top of the popcorn (don't mix in) and quickly pour the caramel mixture on top of the nuts and popcorn. Stir it all together and pour onto a foil-lined jelly roll pan.

Bake at 250 degrees for 20-25 minutes, stirring once after 15 minutes.

When it's done, stir it again to cool off and remove the foil from the pan. Melt 2 squares of almond bark or 1/3 C white chocolate. Using a fork, flick the white chocolate onto the cooling popcorn. 

This is my favorite part! INDULGE. 
If your household is anything like mine then half of your batch has already been sampled and devoured.
(You can place it in the fridge if you need the chocolate to set quickly.)
These make gorgeous little gifts and they taste even better than store-bought gourmet popcorn!
And here you have it. Cinnamon caramel corn with pecans and white chocolate.
 Sincerely, Little Bakin' Blonde

Thursday, August 26, 2010

Spicy Honey Chicken & Cilantro-Lime Rice with Pineapple

First, I didn't take any pictures! But, I’ll be making this soon again and will post them.
This has definitely become a favorite for us! It's quick, easy, and you don't have to worry about marinating the meat. Its not very spicy as it is allows you to adjust the heat with the chipotle powder. Paired with cilantro and lime rice with crushed pineapple... DELISH!!! It's a perfect meal. 

Spicy Honey Chicken
8 boneless skinless chicken thighs, about 2lbs (Yes, thighs. I used breasts this last time and it was still very good. Thighs are still better.)
Rub:
2 t granulated garlic
2 t chili powder
1/2 t onion powder
1/2 t coriander
1 t kosher salt
1 t cumin
1/2 t chipotle chili powder
Glaze:

1/2 C Honey

1T Cider Vinegar
  
Combine the rub spices in bowl and mix well.
Trim off any excess fat from the chicken pieces. Pat dry. Drizzle canola oil over chicken and rub in with your hands to lightly coat all the pieces. Then toss chicken with the spice rub to coat all sides well. Use your hands and get in there! Grill chicken for 3-5 minutes on each side, until cooked through.

While chicken is cooking, warm honey in the microwave so it's not so thick. Add the vinegar and combine well. Reserve 2T honey glaze for later. Take the rest and brush on chicken (both sides) in the final moments of grilling. This time, I substituted the apple cider vinegar (I didn't have any!) for white distilled, brown sugar, 1 t liquid smoke, and 2 T BBQ sauce. It turned out just as good!

I'm gonna warn you that this can make a hot mess, literally. It's sugar, and it's gonna drip. But the smelly smoke is worth it for a minute or two. Just leave your grill on for a few minutes after the chicken is done to burn off any excess glaze. It's totally worth it once you taste this stuff.
Since it's August AND in I'm in Texas, I'm not about to step foot near our BBQ grill, I just simplified and use an indoor grill pan and broiler. 
Remember how I had you reserve that extra couple tablespoons of glaze? Ya, drizzle that on top now. Your taste buds will thank you.

Cilantro and Lime Rice with Crushed Pineapple
You can pretty much eyeball the measurements for this recipe. 
1 cup white rice (2 c. water)
2 T butter
Juice from one large lime (taste as you go, I add a lot!)
1 small can crushed pineapple, drained. 
½ - ¾ C chopped fresh cilantro
Salt and pepper to taste

Cook rice. As soon as it’s done, toss in the butter and stir to melt. Add lime juice, pineapple, and cilantro. Stir to combine, and then add salt and pepper to taste. Serve immediately.
* You’ll want to serve this right away, if you don’t, the flavors tend to mellow a bit and you’ll probably need to add more lime juice because the rice kind of sucks it up. If you’re not quite ready to eat when your rice finishes cooking, just toss in the butter and keep a lid on it so it stays warm. Then right before you serve it, toss it all together.

Friday, July 23, 2010

Our Favorite Fajita's

Fajitas are always our first choice at any Mexican restaurant! I could live off fajitas and Chili's chips & salsa w/ avocado ranch... forever. I'd be even happier if Coke Zero was in that picture. With that aside, this marinade makes the best fajitas EVER. Try these if you really want to impress your family and make a dish that will put all of those hole-in-the wall Tex-Mex shops to shame. 

Fajitas Marinade
1/4 C fresh lime juice
1/3 C water
2 T vegetable oil
2 cloves garlic, pressed or finely minced
3 t vinegar
2 t soy sauce
2 t liquid smoke
1 t salt
1/2 t chili powder
1/2 t cayenne pepper
1/4 t ground black pepper
1/4 t onion powder
optional: minced jalapeƱos, depending on how hot you like it
For the Fajitas:
-Boneless skinless chicken breasts (about 3 large ones). Steak is also great.
-Bell Peppers (about 3 large ones) I always use Red, Yellow, and Orange because they're the sweetest, but you can use whatever you like. 
-1 Onion. I prefer a red one just because the color looks so great in there.
Mango Salsa- mango, purple onion, jalapeno, lime, cilantro, salt, and garlic.

Pico de Gallo-tomatoes, purple onion, jalapeno, lime, cilantro, and salt.

Sincerely, Little Bakin' Blonde